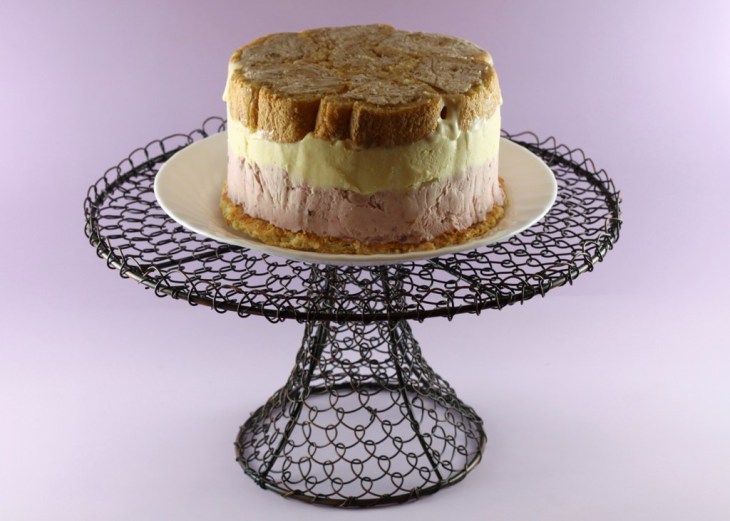
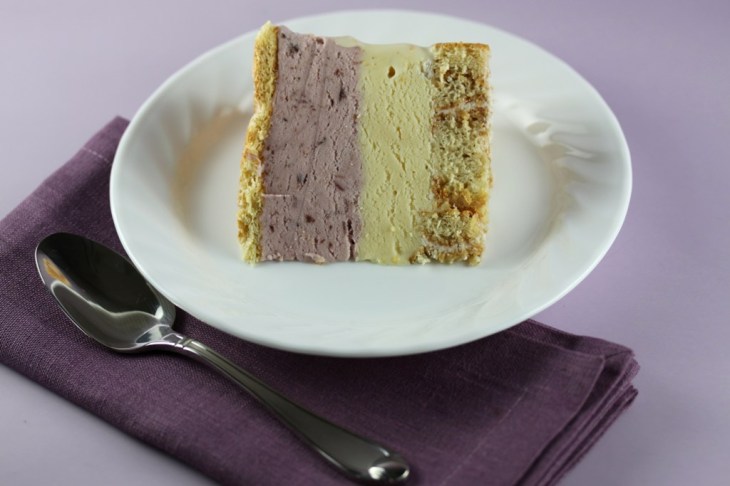
This month’s daring bakers challenge comes from Sunita at Sunita’s World Life and Food. I made four components for this challenge, a vanilla cake, the vanilla whipped cream that is the filling for the swirl cake, birthday cake flavored ice cream, and cherry ice cream. Two different flavors of creamy home-made ice cream sandwiched between soft vanilla cake, delicious! This was the perfect challenge for the hot days we’ve been having in DC.
Making all the components for the ice cream cake can be a little time-consuming. I had been wanting to try birthday cake ice cream and it turns out that it really does taste like yellow cake. I had a lot of cherries in the freezer that I wanted to use up so cherry ice cream was a logical choice. You can always make the cake and use store-bought ice cream, which will save you a lot of time.
Once you have made all the components, you want to line a 6 by 3 inch round cake pan with plastic wrap. Slice the filled cake roll in 1 inch slices. Arrange the cake slices on the bottom of the pan or bowl, making sure to fill all gaps, and freeze for 1 hour. Spread the first layer of ice cream, freeze for 1 hour. Spread the second layer of ice cream, freeze for 1 hour. Place the piece of cake that you cut out to fit your pan on top of the last layer of ice cream and freeze for 4 hours before slicing. Remove the cake from the freezer, turn cake out of the pan, let sit for about 5 minutes and then slice.
I really liked the birthday cake flavored ice cream, it was sweet and had a very creamy consistency. The cherry ice cream had the tartness of the sour cream and cream cheese, and the sweetness of the cooked cherries. What is your favorite ice cream flavor?
Vanilla Cake and Filling (from Real Simple Magazine)
Ingredients:
¾ cup flour
1 teaspoon baking powder
½ teaspoon salt
4 eggs, separated
1¼ cups granulated sugar
2 teaspoons vanilla
confectioners’ sugar
1 cup
Procedure:
1. Heat oven to 375° F.
2. Lightly coat a jelly-roll pan (a cookie sheet with sides) with vegetable cooking spray. Line the bottom with parchment paper. Combine the flour, baking powder, and salt in a small bowl; set aside.
3. Using an electric mixer at high-speed, beat egg whites until foamy. Gradually add ½ cup of the granulated sugar, one tablespoon at a time, and continue beating until stiff peaks form.
4. In another bowl, beat egg yolks and another ½ cup of the granulated sugar until pale and thick. Beat in 1 teaspoon of the vanilla. Use a rubber spatula to gently fold the flour and beaten yolks into the whites until just blended. Spread in pan. Bake 15 minutes or until the cake springs back when lightly touched.
5. Meanwhile, place a clean dish towel on the counter and dust it lightly with confectioners’ sugar. When the cake is done, loosen the edges from the pan with a knife and invert the cake onto the towel. Peel off the waxed paper. Roll the cake lengthwise, along with the towel, and set aside, at room temperature, to cool. Can be made up to one day ahead.
6. Whip the cream with the remaining ¼ cup of sugar and 1 teaspoon vanilla until soft peaks form. Unroll the cake, from one corner of the cake cut about ¼ of the cake. From this piece cut out a 6 inch circle (the size of the pan where you will be making the cake). This will serve as the bottom layer of the ice cream cake. Spread the remaining part of the cake with the whipped cream and reroll. Cover with plastic wrap, and keep in refrigerator until ready to use.
Birthday Cake Ice Cream (Adapted from Fake Ginger)
1 cup milk
½ cup white sugar
2 egg yolks, beaten
1 teaspoon vanilla extract
1/4 teaspoon butter flavoring
1/8 teaspoon almond extract
2 cups heavy whipping cream
¾ cup yellow cake mix, sifted
1. Whisk together milk, sugar, egg yolks, vanilla, butter flavoring, almond extract, cream, and cake mix in a saucepan until well blended. Cook over medium-low heat until mixture reaches 176°F stirring frequently. Remove from heat and place in the refrigerator or freezer until liquid is cold.
2. Pour the chilled mixture into an ice cream maker and freeze according to manufacturer’s directions. Store in an air tight container for up to 2 weeks. Yields about 1 quart.
Cherry Ice Cream
Cherries in syrup:
2 lbs cherries, pitted
¼ cup water
1 cup sugar
Ice Cream Base:
2 cups heavy cream
1 cup whole milk
¾ cup granulated sugar
Salt
5 large egg yolks
½ cup cream cheese
½ cup sour cream
1 tablespoon Kirsch
Prepare the cherries:
1. Place cherries in a medium sauce pan with water, lemon juice, lemon zest, and sugar. Cook over medium heat until cherries are soft and the juices have thickened. Once cooled, roughly puree in blender.
Prepare the ice cream:
1. Place the cream, milk, sugar, and a pinch of salt in a medium saucepan. Warm the mixture over medium heat for about 5 minutes, until bubbles begin to form around the edge of the pan.
2. Prepare an ice bath, and set aside.
3. Whisk the egg yolks in a bowl. Add half of the warm milk mixture into the egg yolks. Pour the egg/milk mixture into the pan with the rest of the warm milk and cook over low heat stirring constantly until the custard thickens and an instant read thermometer registers 175°F. Strain the mixture into a bowl, and then place bowl over ice bath, stirring the mixture to cool it down.
4. Once the custard has cooled, add the cherry puree, cream cheese, and sour cream and mix well. Refrigerate until custard is completely chilled. Add Kirsch, and freeze in ice cream maker according to manufacturer’s instructions. Store in an air tight container for up to 2 weeks. Yields about 1 1/2 quarts.


Looks gorgeous and perfect!
It looks so beautiful. To me certain cakes might have a few steps more than the average one, but the end product might be well worth all the trouble. i am just in love with the visual of your cake – shame I can try this one. Might have to make my own and then i will be able to taste it. o )
I love it! I think it looks a little neater than some because you only put the swiss roll slices on the top. I also recently tried cake batter ice cream, and it’s one of my favorites.
By the way, I love the new theme!
Love how you shaped your cake. The colors are also beautiful. Sounds really delicious!
Que rico se ve! Quiero comerlo todo!